Sunday, November 20, 2011

Inspiration, Perspiration, Desperation

I'm HOOKED to Pinterest. In fact, I truly struggle with "pinning" things and know that I need to put down my iPhone {with Pinterest app} so I can actually put those inspiration links to good use.

But it's also humorous when the inspiration, while thought-out and considered, may not play out exactly like I had it planned in my head. Case-in-point...
Disaster!
Ha, this still makes me chuckle on the inside:

1) Clearly I think my poor child's head is much larger than it is.
2) Mason had no interest in lying on hard concrete. He just couldn't understand that this was for a photo project. I mean really-where's his imagination?

Follow me {HERE} on

Monday, October 31, 2011

Happy Halloween

Here are some of our Halloween "Happies" around the house.

Banner template found {HERE} I printed the letters on craft paper, glued to cardstock and cut each of them out. Then I made burlap pennant shapes and sewed them onto a black ribbon. I made black tissue streamer "flowers" basically just scrunching the streamer into a circular form and hot glued them to each pennant and topping with the craft cardstock letters. This puppy is durable and will definitely be re-used each year!
Our sidewalk MONSTERS!
And this is another treat for Toddling M's preschool- I'd signed up to bring fruit cups and wanted to do something with the Halloween theme. So simple, right?
And I hosted Supper Club this month {Long Live Supper Club...going 7 years STRONG!} and made these fun pudding cup desserts. I may have drawn an extra dozen of the Frankenstein cups just for fun...

Thursday, October 20, 2011

Spooky on the Cheap

One of the fun "Crafty Mom" things I get to do is make things for Toddling M's new preschool. What's ironic is that I was making this stuff {holiday crafts} before the Littles, but it was never really cool or appreciated the way it is when you have kids. Funny how homemade is like that!

AND to top it all off, I was able to keep everything down to under $2 per child---so less than ten smackaroos for the whole project. YAY!
I scored some incredible candy deals at Publix all during the month of October for trick-or-treaters--- we're talking $75 worth of candy for about $15 {and about 30% of the candy may or may not have been gobbled by me...I'll never tell}! So naturally with this much candy overload I broke into the stash to use it for our bags.

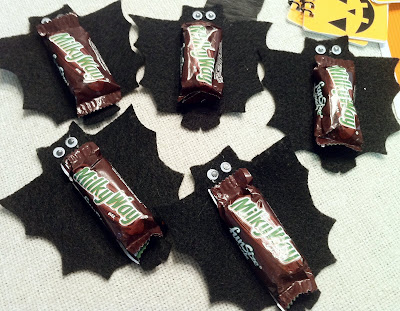
I made some felt candy covers, bat template found {HERE}
And I'd seen the Ghost S'more packages all over Pinterest, pinned {HERE} so of course I had to put together these cool little packages. Labels were black & white decorative tags from the Jones Design Company and she just re-featured them, {HERE}
Then I added some little glow sticks and made labels from {HERE}
I included some Halloween pencils, little notepads, and stickers from the $1 racks at Target {multiple items per package so I split them up}. The white craft boxes were from Walmart and I just cut out black ghost faces and added some black streamers to make it more "spooky."
When they were all put together, the ghostly little boogers warmed my heart!

Saturday, October 1, 2011

Happy Fall Y'all

And since I promised to share some of my Pinterest projects, here's a shot of Toddling M's re-vamped room. I spy 8 projects on this wall

Wednesday, August 10, 2011

Joining the Bandwagon

So what exactly have I been up to these past few months? Well lots of things- make sure to check out and follow my Pinterest Board {HERE}. It’s a new obsession, and after downloading my iPhone App, it’s been something to occupy me while feeding my littlest munchkin. Who eats around the clock. Every. Single. Day.


Did I mention she doesn’t take a bottle? So yes, you can find me on Pinterest and I’ve actually been kept quite busy with the DIY ideas from there. I’ll be sharing many of my projects shortly. {and YES, I really do mean that I’ll actually post them...not just tease you with this and wait another 6 months to actually post something!}


Monday, May 9, 2011

Baby DK

Wow, I’ve really neglected my blogging since Baby Duh-kah’s birth {HERE}, and while it may have been quiet over here for some time, let me assure you it’s been quite loud and hoppin’ over at our house! Toddling M has been such a joyful big brother welcoming Baby Duh-kah, whom he’s now calling “Kay Kate”. I think I may just resolve to refer to her as Baby DK for now.


Meet our smallest little-

Dakota Kate

born May 9, 2011 at 8lbs, 1oz


What a JOY and little blessing!

Tuesday, March 22, 2011

Fabric.com

I can't rave enough about www.FABRIC.com


They're not paying/compensating me for saying any of this either, but I ordered all our wedding fabrics from them {Design Board HERE} and while 1 of the fabrics had to be back ordered, they promptly sent it to me before the original estimated ship date . They had great customer service and actually both called me directly and followed up through e-mail on the order.
I recently took advantage of one of their frequent sales and snatched up 8 different fabrics that averaged out to be $2 per yard. I also ordered a 9th fabric from the Premier Prints line {isn't that a designer favorite!} for nursery curtains and while I wondered if the very low quantity in-stock might mean it'd be backordered, I went ahead and added it to my cart because it was a fantastic price at $6.98 per yard and it also helped make my shipping & handling free {orders over $35 always ship FREE!}.

Long story short, this was indeed backordered; I had an e-mail asking me to confirm I still wanted the order, they went ahead and sent me 2.5 yards that they had on hand last week and today I received 5.5 yards, the full amount I originally ordered. I don't know if it was a glitch or a good gesture of customer service, but it's nice to have the extra 2.5 yards that was pre-shipped...maybe I'll make something else for Baby Duh-kah.
Here's the curtain fabric:

{and it coordinates perfectly with the pink in her Serena & Lily bedding}

I've been in Nesting Mode lately; last week was my Sewing Binge. Check out some of last week's creations on the Baby Blog {HERE}. I'm starting to get the hang of this!

Wednesday, March 9, 2011

Bargain Shopping

One good thing about a rough economy: it forces everyone to revisit finances, reprioritize, review debt, and find new ways to save money.

Thankfully there are simple resources available to help facilitate saving and being a good steward of your money in general. I thought our family was doing pretty well-I decided to shop mostly at Walmart and we are careful to limit our discretionary spending; HOWEVER, the past 6 weeks or so I've really delved more into couponing, searching for deals, and planning our meals and other shopping around current bargains.
  • Check out Southern Savers {HERE}, this blog does an excellent job explaining couponing, stacking coupons, and combining offers in general to get the very best deals.
  • Also Coupons.com and Redplum.com have manufacturers coupons.
  • And if you're planning on shopping at a certain store/restaurant, don't forget to visit their site to see what specials/offers are available.
  • If ordering Online, make sure to Google coupons, promotional codes. My favorite source is Retail Me Not {HERE}
  • We haven't eliminated our Walmart trips; however I try and check for manufacturer coupons for items on our list first. I have a pink coupon book I keep in the car and that way it's always in close enough proximity for my shopping days.
Today when I went to Toys R Us and spent $12.34 on about $20 worth of toys, I decided to drag up those old receipts to share the savings {because who doesn't like to brag on their deals! =) } So here they are for the last 6 weeks:
Publix
Trip #1 spent $37.91, saved $27.70
Trip #2 spent $33.79, saved $27.31
Trip #3 spent $26.68, saved $22.95
Trip #4 spent $23.34, saved $41.71
Trip #5 spent $36.11, saved $48.14
Trip #6 spent $25.16, saved $37.46
TOTAL SPENT = $182.99, TOTAL SAVED = $205.27

And check out a JCPenney trip for Baby Du-kah clothes- spent $12.98, saved $98.09!

Monday, February 28, 2011

Oh Baby Girl- Felt Flower Tutorial

With 10 weeks until Baby Du-kah's due date, it's definitely time for us to start getting things in gear to prepare for her arrival! If I look at the progress I'd made at this point in my first pregnancy, I'm fairly embarassed to say we haven't done much at all for poor Baby D. I suppose it just means it's time for me to get things in order and start actually doing things rather than just planning.

I've seen the infant flower headbands everywhere but last night I started off with trying some felt flowers. I'll have rolled fabric flowers and curled polyester flowers to try next...
Pompom Mums:
Rosettes:
Here's a photo tutorial {click on the photo for a larger view}:

  1. All you need is felt, elastic, glue gun/glue stick, scissors, pinking shears
  2. I cut an 11" strip using pinking shears {about 3/4" wide}
  3. Then I used my regular scissors to create a fringe along this strip using the "points" from the pinking shears as my guide for the width
  4. Begin at one end and roll using a thin strip of hot glue to help adhere your roll
  5. This makes an easy peasy Mum!
  6. Now take your elastic and measure {I used this handy guide HERE to determine length}, you could hot glue or for mine I sewed it together for that extra measure
  7. Cut another felt circle for your flower backing and if you're adding "leaves" then cut and assemble now
  8. Turn your flower upside-down, glue your "leaf", then add your elastic headband, finish the headband off now with your last piece of the felt circle.
  9. Et Voila!- A cute and easy felt flower headband!
And for the rosette variations {click HERE for the Purl Bee's pattern}

Sunday, February 27, 2011

Making the House a Home

I thought I'd share some recent photos taken for this home's MLS listing-we're ready to SELL, SELL, SELL!

I mentioned Kitchen updates {HERE}, but here's the MLS photo...
Living Room...
2nd view of the Living Room... {Spy the Ikea finds: frames, throw, lamp}

Bedroom {Ikea find: rug & wall sconces not yet installed}
I have to remind myself there are layers to decorating a house. Ours isn't where I'd like it to be and I have to keep things neutral to keep it marketable {because this is temporary} but it's much warmer and more like home.

Saturday, February 26, 2011

Toddling M's 2nd Birthday Party

We had a blast last weekend with Toddling M's 2nd birthday party...Mickey Mouse style! Click {HERE} to see many more photos.


Thanks so much to Haley for her gorgeous photos above =) I spread party tasks over 2 month's time so the preparations, homemade decor and crafts, and details were fun to make and even more enjoyable come celebration time!

Party Tutorials:

  • Mouse Ears {HERE} (I used black headbands that didn't need to be recovered & black foam for the ears)
  • Felt Hands & Mickey Pinata {HERE}

Edit: Here's a photo of the party favors each guest brought home. I found little black tote bags at Hobby Lobby and filled them with Mickey stickers, favor sacks with Mickey-shaped Oreo faces inside, bubbles with personalized "Thank You" tags, kaleidescope, Mickey headband, and of course the personalized sugar cookie for Cookie Queen of Alabama.

Saturday, February 12, 2011

What's Been Cooking

While our Ikea trip isn't until today, I've tried to make a few additions to kitchen decor in the meantime. Since we don't have a decor budget per se, it's been some small changes here and there. Here's what 2 hooks, 1/2 yard of fabric, and a 50% off chalkboard can do:
A balloon valance & 2 of my hobnail pitchers on display...
The 50% off chalkboard had a very silly print on top that I easily painted over. Then I used a hook to hang it on our refrigerator...

Friday, February 11, 2011

Toddling M Turns TWO!

I can hardly believe he's now 2-years old! My baby is growing up so quickly. We've had a banner day today and I think he's enjoyed every bit of it.
While the day in photos are {HERE}, I did want to point out some of the birthday crafts and things I had fun with in preparation for our little day celebration.


The birthday plate was customized and purchased last year {sorry I can't remember the source but will keep searching in my e-mail archives}, so I went with the pool blue/green theme and made a cupcake stand for his little brownie cake. It's easy peasey too! I found the tutorial {HERE}. Instead of doing cupcakes though, I took a wine glass and cut out 2 brownie circles and stacked them just like a 2-tier cake. I think it turned out great =)I had this fabric pennant on-hand from before M was born. I used Martha Stewart's free printable banner letters {HERE} and then simply taped them to the pennant banner. SUPER EASY!
And then of course I had to leave a message for the Birthday Boy on our new refrigerator chalkboard. More on this craft tomorrow...

Thursday, February 10, 2011

Ikea Hunt

I'm on the Hunt! I have a "Most Wanted" list already created {bottom of post}, but have tried to do some Online and catalog pre-shopping research prior to our Ikea trip this weekend. Here are some of my favorite super-inexpensive finds & everything below is under $50!

And I'd love to hear your great Ikea finds/suggestions too!

MOST WANTED
  • table lamp
  • medium-sized mirror
  • picture light
  • bedside wall sconces
  • oversized frames
  • rug for our Master Bedroom
  • art easel {toddling M}
  • 4 chairs {toddling M}

My Loves

“I concluded…that all those virtuous human emotion need not be freely given. Respect is commanded or demanded. Admiration is won sometimes against the will. It is impossible to admire someone we dislike. Loyalty and trust we entice or win from others. A sense of awe or adoration for God descends upon us from realisation. Certainly all these emotions may be present in love but they are not love itself. Love is freely given. It is a matter of choice. Love is wanting what is best for the other person, even if what is best for them is not going to suit the lover. Love is totally selfless and it is an act, not an emotion. We often mistake it for emotion because it is usually contained in strong emotions. But love is not an emotion…love is creative action. It is the most creative act in the universe”.

from “Ordinary Insanity” by Emma Pierce


Within the next few days my "Love Celebrating" will be overflowing. I suppose it's fitting as Valentine's Day is quickly approaching:

Friday my firstborn turns 2 years old!

Saturday my husband is treating me on an Ikea shopping spree! We'll make a day of it too, so I'm hoping the weather will cooperate for our trip. This is only the 2nd time for me to go to an Ikea...I can hardly wait. The first time I was with Dear Friend and just not in the mood to go shopping. But this time I'm pumped!

Sunday is my sister BeeBee's birthday! I can hardly believe my "little" sister will be 26. Sheesh I'm OLD!

Monday is Valentine's Day and a time to celebrate Love. Even though my husband says it's an overcommercialized "holiday" that he's disliked since he was Toddling M's age, last night I seriously suggested starting the tradition to make it sentimental and not purchase anything---something like a nice love note would do. Ha! Apparently my darling husband must have something else in mind because he nixed that idea and said we could do "a little something." Uh-ohhh...sounds like I need to put on my Creativity Cap and come up with something more than a card! Any ideas?

Thursday, February 3, 2011

Year of the Rabbit

Alright, alright, alright...

I'm not going to even pretend I know much at all about the Chinese New Year, but I can kind of claim to by virtue of my ethnicity {right?}. Ha!
Toddling M received 2 special red envelopes in the mail from Aunt BeeBee {who is Korean} and another from her Vietnamese friend.
For those billions who celebrate it...Happy New Year!

Monday, January 31, 2011

Cheesecake Parfaits

I promise this won't become just a recipe blog, but lately I've been cooking up a storm {blame it on the belly} and in honor of a sweet holiday coming up in 2 weeks {VALENTINES!}, I thought I'd share an equally sweet dessert. This is a slightly altered Kraft recipe, and it turned out wonderfully:
Cheesecake Parfait
  • 1 Pkg- Cream Cheese, softened
  • 1 1/2 Cups- Milk
  • 1 Pkg- Instant Vanilla Pudding
  • 2 Cups- Cool Whip, thawed
  • 2 Cups Nilla Wafers {coarsely chopped, I tried to cut them in fourths}
  • Blackberries {they were on sale, but any seasonal berries will do}
  1. Beat cream cheese with your mixer until it becomes very creamy {this is kind of a mess, but you don't want chunks of cream cheese in your parfait}.
  2. Beat in milk.
  3. Add the dry pudding mix & mix well.
  4. Add Cool Whip.
  5. Layer wafers, berries, then pudding mixture into your glasses. Repeat & top with Cool Whip if desired.